This short manual explains how to use the video-setup the EWP has prepared for you in Studio 1. As soon as the demand for recording locations will increase, Studio 2 and Studio 4 will be equipped with the same camera setup.
The video recordings can be made with our new Sony FDR-AX100. Please handle the camera with care – just imagine it’s actually yours. Also keep in mind that you have to provide your own SD-card for storage of your recording. When you completely forgot this, you can buy a SD-card at the desk. To determine which card you need, please check this link about the length of recordings in relation to the storage capacity.

Step 1.
Turn on the main switch. This switch is located on the power strip.
Step 2.
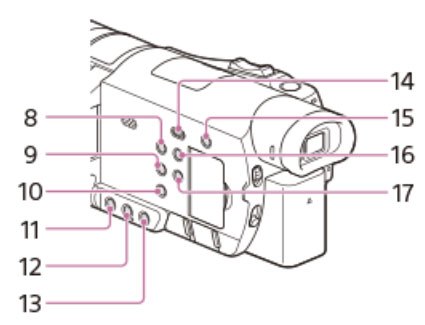
Turn on the camera by pushing the “power” button on the side of the camera (location 8).
Step 3.
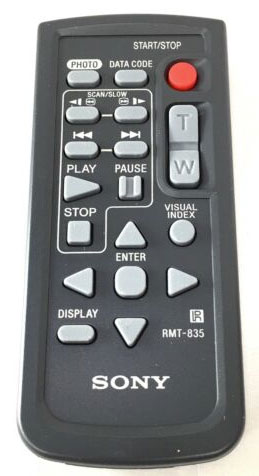
Turn on the TV using the remote control. The TV is meant to monitor yourself and check if you are properly in the frame. (The TV is on mute in order to avoid feedback).
Step 4.
Insert a SD card in the camera (the little door on the side). On the upper right corner of the screen you see the amount of time you can record on your SD card.
- Note 1: The camera quality is set to Full HD (1080P) 25 fps, which is a good quality for most purposes. Please do not change any setting. If you really have to change something, make sure that you change it back to where it was.
- Note 2: that in some cases you have to format the SD card in order to be able to record on it. In that case, you need to go to the Menu/Setup/Format
- Note 3: Our colleagues from the theatre installed a powerful light. You can put yourself in the spotlight! The best (video) result you will get with a setting of 40% indicated on the small dimmer connected to the light.
Step 5.
Now you are ready to record. You can use the small remote control of the camera to start and stop the recording (with the red button on the remote). With this small remote control you can also zoom in- and out if necessary. When the camera records you see “REC” in red on the camera monitor.
Step 6.
Playback. You can check your recording at the spot by going to the Menu/Playback functions on the remote control. Alternatively, you can use the playback button on the side of the camera. Keep in mind that the TV is on mute. In order to listen to the recording you should un-mute the TV.
While recording, TV should be muted again, otherwise you get feedback.
Step 7.
When you are done with the recording, take out your SD-card and please make sure that you switch off the main power. Please also clean the buttons of the remote and camera softly, so the next user can start with a clean setup,
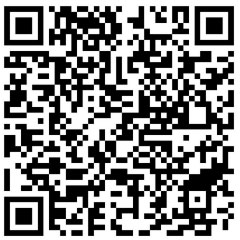
For more information about how to use the camera check the link for the manual or scan the QR code:
When you still have questions, please contact us: ewp@koncon.nl